Tirzepatide Injection Site Guide: Step-by-Step Instructions for Every Format
Medically reviewed by WeightLossInjections.com Staff•Updated July 23, 2026•29 min readMedically reviewed
⤢
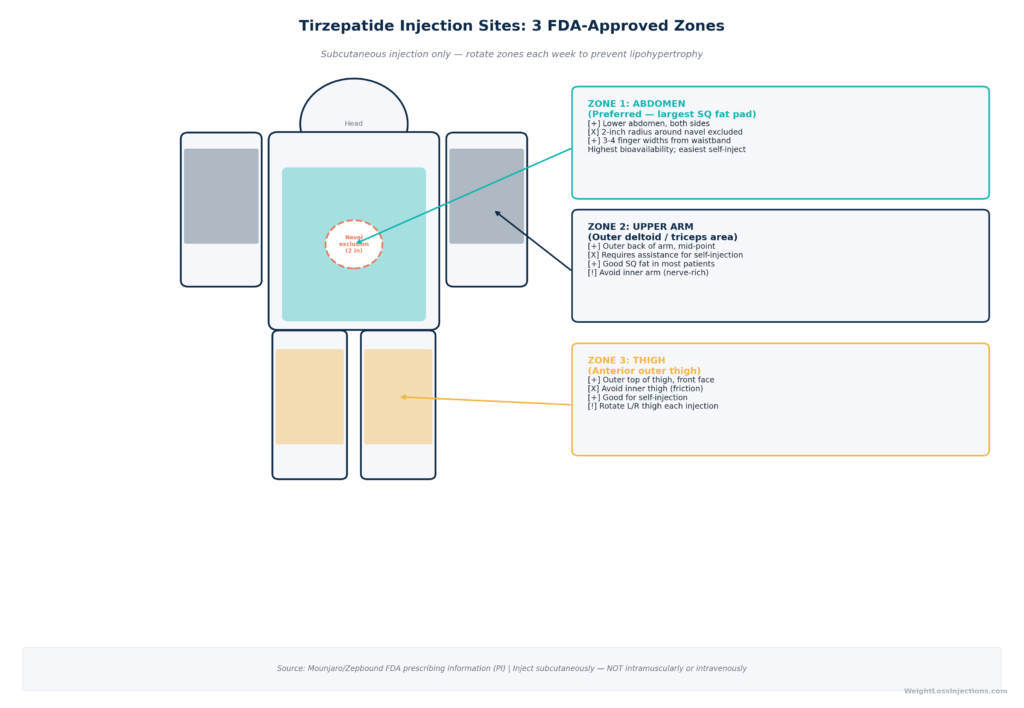
Approved tirzepatide subcutaneous injection zones. All three sites — abdomen, upper outer thigh, and posterior upper arm — are validated by the FDA-labeled prescribing information for Mounjaro and Zepbound. Red zones indicate areas to avoid: the 2-inch navel radius, inner thigh, joints, and scarred skin.
Medical Disclaimer: This content is for informational purposes only and does not constitute medical advice. Tirzepatide (Mounjaro®, Zepbound®) is an FDA-approved prescription medication. Always follow your prescribing provider’s specific instructions for your formulation, dose, and injection technique. If you experience signs of a serious allergic reaction — hives spreading beyond the injection site, facial swelling, throat tightening, or difficulty breathing — stop injecting and call 911 immediately.
Tirzepatide is a once-weekly subcutaneous (under the skin) injection administered into one of three FDA-approved body zones: the abdomen (at least 2 inches from the navel), the upper outer thigh, or the posterior upper arm.
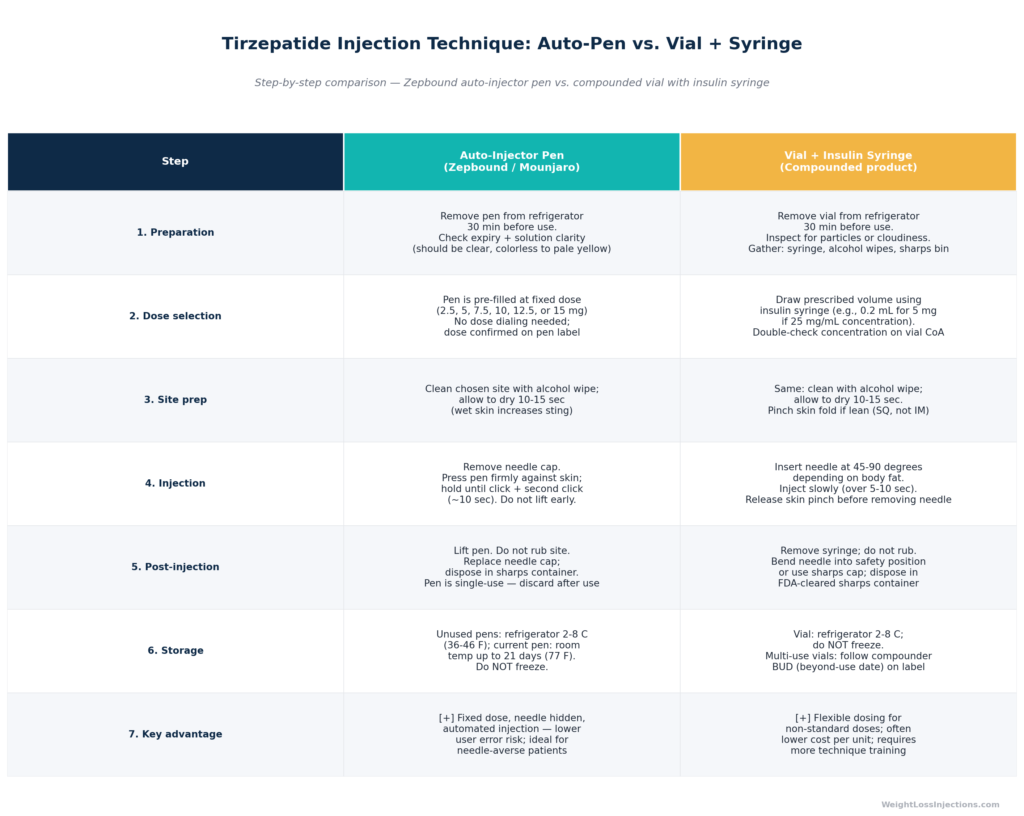
Compounded tirzepatide comes as a vial requiring a syringe — the technique is meaningfully different from the branded Zepbound/Mounjaro KwikPen autoinjector. Both approaches are covered step by step below.
If you are using a compounded vial, always confirm the concentration on your label before drawing your dose. The same 5 mg dose draws as 1.0 mL from a 5 mg/mL vial but only 0.5 mL from a 10 mg/mL vial. Concentration confusion is the leading compounding-specific dosing error.
Rotate your injection site with every dose. Never return to the exact same spot within 7–14 days. Systematic rotation prevents lipohypertrophy — a fatty-tissue thickening that silently reduces drug absorption.
Common injection site reactions (mild redness, brief itching, small bruise, temporary soreness) are expected and self-limiting. A growing, warm, tender lump with spreading redness days after injection is a reason to call your provider.
This guide covers the full technique for both vial-and-syringe and KwikPen, a 4-zone rotation framework, troubleshooting every common problem, storage and travel requirements, and safe sharps disposal.
You have your tirzepatide. You have your supplies. And now you are standing in front of a mirror trying to figure out the exact right place to put the needle — and whether you are doing it correctly. That uncertainty is more common than you might think. A large share of patients starting any subcutaneous injectable medication — insulin, semaglutide, or tirzepatide — receive less injection technique education than they need at the point of prescribing. The result is a patchwork of instructions found online, some conflicting, some applicable to a branded pen but not a compounded vial.
This guide is built specifically for tirzepatide. It handles both delivery formats — the branded Zepbound® and Mounjaro® KwikPen autoinjector and the compounded tirzepatide vial-and-syringe format — with complete step-by-step protocols for each. It covers site selection, rotation strategy, injection technique, troubleshooting, and disposal. Every recommendation is traceable to labeled FDA prescribing information, peer-reviewed injection technique literature, or manufacturer instructions.
Approved Injection Sites: Abdomen, Thigh, and Upper Arm {#approved-sites}
Tirzepatide is a subcutaneous injection — meaning it is deposited into the fatty tissue that lies directly beneath the skin, above the muscle. This tissue layer, called subcutaneous fat, provides a reliable, vascularized depot from which the drug is absorbed slowly and predictably into the bloodstream. The fatty-acid moiety on the tirzepatide molecule enables it to bind albumin in the bloodstream, sustaining a half-life of approximately 5 days and enabling once-weekly dosing. (FDA Clinical Pharmacology Review, NDA 215866)
The abdomen is the most widely used tirzepatide injection site and, for most patients, the most accessible. The subcutaneous fat layer here is generally consistent across a wide range of body weights, and it offers the largest surface area of the three approved zones — which is important for systematic rotation.
The critical rule: stay at least 2 inches (approximately 5 cm) from the navel in every direction. The tissue immediately around the umbilicus has increased vascularity and a higher concentration of nerve endings, making injections there more painful and slightly more prone to inadvertent intravascular proximity. (FDA Mounjaro Prescribing Information, NDA 215866) Outside that 2-inch exclusion zone, the entire abdominal surface — left and right flanks, upper and lower quadrants — is available. In practical terms, most adults have room to divide the abdomen into eight or more distinct injection zones, providing ample surface area for a rotation plan that never returns to the same spot within several weeks.
Absorption from the abdomen is at least as fast as, and likely marginally faster than, other approved sites due to the rich capillary network in the periumbilical fat. Published pharmacokinetic data from the FDA Clinical Pharmacology Review shows that the time to peak serum level (Tmax) after subcutaneous tirzepatide injection is 8–72 hours, with some variation by site — but overall bioavailability and AUC do not differ significantly enough between sites to influence treatment decisions. (FDA Clinical Pharmacology Review, NDA 215866) Site choice is primarily about comfort and sustainable rotation — not pharmacokinetic optimization.
The Upper Outer Thigh
The lateral (outer) surface of the upper thigh — roughly the front-outer area, midway between the hip and the knee — is the second approved site. This region works particularly well for self-injection while seated, which many patients find reduces anxiety and needle-movement risk. Each thigh provides several distinct injection zones when divided systematically along its lateral surface.
Use the outer half of the thigh only. The inner thigh carries less subcutaneous fat, sits in closer proximity to major femoral vessels, and is significantly more sensitive — all of which make it an inappropriate injection site. (StatPearls — Tirzepatide, NCBI Bookshelf) Avoid the very top of the thigh near the hip crease and the area immediately above the knee; target the middle third of the outer thigh.
The Posterior Upper Arm
The back of the upper arm — the deltoid region on the posterior surface, not the IM-injection mid-deltoid zone used for vaccines — is the third approved site. There is generally a good subcutaneous fat layer here, and arm injections add valuable rotation variety for patients who would otherwise rely exclusively on the abdomen and thigh.
The practical challenge: self-injection in the posterior upper arm is difficult for most people without a mirror, a rotation-assistance device, or a partner to help. The anatomy is hard to visualize unaided, and injecting there with poor positioning can shift the needle angle in ways that risk IM delivery. This site is best used when a caregiver or partner can assist. If arm injections are part of your rotation plan but you inject solo, consider using a dedicated injection assistive device or angling toward the outer-lateral aspect of the arm where you can see and control the injection more easily.
Why Subcutaneous, Not Intramuscular?
Tirzepatide is engineered for subcutaneous delivery. The molecule’s fatty-acid chain and albumin binding provide the controlled, sustained absorption profile required for its once-weekly dosing schedule. Intramuscular injection delivers the medication into a highly vascular tissue with far faster absorption, which would alter the pharmacokinetic profile — producing higher peak concentrations and shorter effective duration. One accidental IM injection is not dangerous, but it may produce more intense GI side effects from the faster absorption peak. Consistent IM delivery would undermine the dosing schedule. (FDA Mounjaro Prescribing Information, NDA 215866)
Staying subcutaneous requires choosing the correct needle length, using proper pinch technique for lean patients, and injecting at the correct angle — all covered in the technique sections below.
Step-by-Step: Compounded Tirzepatide Vial and Syringe {#vial-technique}
Important legal context: As of June 2026, mass-market compounded tirzepatide is not lawfully available. Tirzepatide is no longer on the FDA Drug Shortage List. A narrow 503A exception survives for state-licensed compounding pharmacies that document a specific clinical justification — such as allergy to an inactive ingredient in the branded product or a dose strength not commercially available — limited to four or fewer prescriptions per month. If you are receiving compounded tirzepatide, confirm that your pharmacy operates under a valid state license with a documented clinical rationale for your prescription. (FDA GLP-1 Compounding Clarification Page)
This section is the most important part of this guide for compounded vial users. A vial-and-syringe injection requires more steps than an autoinjector pen, and the stakes for accuracy are higher — particularly around dose concentration verification, air bubble removal, and needle selection.
Equipment Checklist (Vial Format)
Before you begin, gather everything on a clean, flat surface:
Compounded tirzepatide vial — confirm the concentration on the label (e.g., 2.5 mg/mL, 5 mg/mL, or 10 mg/mL) and verify it matches your prescription
Insulin syringe: 0.5 mL or 1 mL capacity; 28–31 gauge; ½ inch (12.7 mm) needle — BD 31g 5/16″ (8 mm) is the most commonly recommended gauge/length combination for subcutaneous tirzepatide
Alcohol wipes × 2 (one for the vial stopper, one for the injection site)
Clean sharps container for immediate disposal of used needle and syringe
Optional: small ice pack to numb the site briefly if you have needle anxiety (apply 30–60 seconds before injection, then let skin return to room temperature before injecting)
Optional: clean cotton ball or dry swab for post-injection pressure
Understanding Vial Concentrations Before You Draw
This is the most critical compounding-specific safety step. Compounded tirzepatide vials are manufactured in multiple concentrations, and the same prescribed dose requires very different draw volumes depending on the concentration your pharmacy dispensed:
Prescribed Dose
2.5 mg/mL vial
5 mg/mL vial
10 mg/mL vial
2.5 mg
1.0 mL
0.5 mL
0.25 mL
5.0 mg
2.0 mL
1.0 mL
0.50 mL
7.5 mg
3.0 mL
1.5 mL
0.75 mL
10 mg
4.0 mL
2.0 mL
1.00 mL
12.5 mg
5.0 mL
2.5 mL
1.25 mL
15 mg
6.0 mL
3.0 mL
1.50 mL
Note: Volumes exceeding standard insulin syringe capacity (0.5 mL or 1.0 mL) may require a larger syringe or a divided injection. Consult your prescribing provider for doses requiring more than 1.0 mL per injection.
A dosing error from concentration confusion — drawing a “5 mg dose” from a 10 mg/mL vial as 1.0 mL instead of 0.5 mL — delivers twice the prescribed dose. Superpotency from this type of error has been documented in FDA adverse event reports from compounding pharmacies. Verify the concentration on your vial label against your prescription every single time you draw a dose, not just the first time. (FDA GLP-1 Compounding Clarification Page)
Warning: If your vial arrived as a lyophilized (freeze-dried) powder requiring reconstitution with a diluent, do not substitute a different diluent from what the pharmacy provided or specified. Incorrect reconstitution changes the final concentration and can deliver a superpotent or subpotent dose. Follow your pharmacy’s reconstitution instructions exactly.
Dose volume reference for compounded tirzepatide vials. The required draw volume changes significantly across concentrations. Cells highlighted in yellow indicate volumes that may exceed a standard 1 mL insulin syringe capacity — contact your prescribing provider for guidance on these doses.
Needle Selection: Why 31g 5/16″ Is the Standard
For subcutaneous tirzepatide injection from a vial, the most commonly recommended needle specification is 31 gauge, 5/16 inch (8 mm). This gauge provides:
Fine enough diameter to minimize tissue trauma, pain, and bruising
Sufficient length to reliably reach subcutaneous fat in most adult patients injecting at 90°
Adequate flow for the relatively viscous tirzepatide formulation (finer gauges like 32–33g may cause excess flow resistance and require uncomfortable force on the plunger)
For very lean patients with minimal subcutaneous fat (particularly at the thigh), a 6 mm needle may be preferable to reduce IM risk. For patients with more abdominal adiposity, 8 mm is generally sufficient at 90° with no pinch. If you are unsure about needle length, ask your prescriber or a pharmacist familiar with your body habitus.
Step-by-Step Injection Technique: Compounded Vial
Step 1 — Wash your hands. Wash thoroughly with soap and water for at least 20 seconds. Dry with a clean towel. Hand hygiene before injection is the most effective single step against injection site infection.
Step 2 — Remove the vial from the refrigerator 5–15 minutes before injection. Injecting cold solution causes stinging and increases local tissue irritation. You do not need to wait 30 minutes as with a pen — the smaller solution volume in a syringe warms faster. Do not microwave the vial or place it in hot water. Do not attempt to warm by shaking.
Step 3 — Inspect the vial. The solution should be clear to slightly yellow or colorless. Do not use the vial if the solution appears cloudy, milky, or visibly discolored, or if it contains visible particles or floating matter. A cloudy tirzepatide solution may indicate protein aggregation, contamination, or improper storage — all of which are reasons to contact your pharmacy.
Step 4 — Wipe the vial stopper with a fresh alcohol wipe. Use a new 70% isopropyl alcohol swab in a single circular swipe across the rubber stopper. Allow it to air-dry for 5–10 seconds before inserting the needle.
Step 5 — Draw air into the syringe equal to your prescribed dose volume. Pull the plunger back to your calculated draw volume (e.g., 0.5 mL for a 5 mg dose from a 5 mg/mL vial). This air is injected into the vial to prevent vacuum lock and make drawing the solution easier.
Step 6 — Insert the needle through the vial stopper at 90°. Push the plunger all the way down to inject the air bubble into the vial.
Step 7 — Invert the vial. With the needle still inside and pointing up (toward the now-inverted vial bottom), slowly draw back the plunger. Pull slightly more than your required dose volume — drawing a small excess makes air bubble removal easier in the next step.
Step 8 — Remove air bubbles. Hold the syringe with the needle pointing upward. Tap the barrel gently with your fingernail to encourage any air bubbles to rise to the top. Slowly push the plunger until the bubbles exit through the needle and you have your exact prescribed dose volume. Air bubbles in the syringe waste part of your dose and may sting slightly on injection; removing them is worth the extra 30 seconds.
Step 9 — Remove the needle from the vial. Withdraw the needle with a smooth, straight pull. Do not recap.
Step 10 — Select and prepare the injection site. Choose your rotation zone per the schedule (see Rotation section below). Wipe the skin with a fresh alcohol wipe using a circular motion from center outward. Allow the skin to dry completely for 10–15 seconds. Injecting through wet alcohol causes stinging and briefly introduces alcohol into the subcutaneous tissue.
Step 11 — Pinch the skin if appropriate. For most adults with typical subcutaneous fat at the abdomen or outer thigh, a skin pinch is optional. For lean patients with minimal SC tissue, pinch 1–2 inches of skin gently between your thumb and forefinger to elevate the fat layer above the muscle. Maintain the pinch throughout the injection.
Step 12 — Insert the needle. At the abdomen or thigh with average subcutaneous fat depth: insert at 90° (perpendicular to the skin surface). For lean patients or the thigh where fat depth may be shallower: insert at 45°. Insert in one smooth, confident motion — hesitating or going too slowly increases tissue drag and discomfort.
Step 13 — Inject slowly and steadily. Push the plunger all the way down at a moderate, even pace. Do not rush. Injecting too quickly increases stinging and tissue pressure.
Step 14 — Remove the needle at the same angle as insertion. Withdraw smoothly without changing the angle.
Step 15 — Apply gentle pressure. Do not rub. Press a clean cotton ball or dry swab against the injection site for 5–10 seconds. Gentle pressure minimizes minor bleeding. Rubbing is counterproductive: it can spread blood from disrupted capillaries (causing bruising) and may push medication into deeper tissue planes, including muscle.
Step 16 — Dispose of the needle and syringe immediately. Place the used syringe directly into a sharps container without recapping. See the Disposal section below for sharps container options.
A Note on Citrate Buffer and Stinging
Some compounded tirzepatide formulations use a citrate buffer system (sodium citrate/citric acid) rather than the phosphate buffer used in branded products. Citrate buffer formulations are well-documented to cause a stinging or burning sensation on injection that is noticeably more intense than phosphate-buffered products. This is a known pharmacological property of citrate ions interacting with sensory receptors in the skin — it does not indicate an allergic reaction or a problem with the formulation. If your compounded tirzepatide stings on injection, ask your prescribing provider whether your pharmacy uses citrate buffer and whether a phosphate-buffered alternative is available.
Warming the solution to room temperature before injection reduces but does not eliminate citrate-related stinging. Slow injection technique also helps.
The Zepbound® and Mounjaro® KwikPen is an autoinjector that simplifies the injection process significantly. The needle is pre-attached, the dose is pre-set, and the device delivers 0.5 mL per injection regardless of dose strength. (Zepbound HCP Dosage and Administration — Eli Lilly) There is no drawing, no air bubble removal, and no concentration calculation. The primary technique errors with the KwikPen are removing it too early before the dose completes and injecting while the solution is still cold from the refrigerator.
Branded tirzepatide pens are available in six dose strengths: 2.5, 5, 7.5, 10, 12.5, and 15 mg, following the same titration schedule used in the SURPASS and SURMOUNT clinical trial programs. (FDA Zepbound NDA 217806 Medical Review; GoodRx — Tirzepatide dosage guide) For patients who cannot access or prefer not to use the autoinjector pen, Eli Lilly also makes Zepbound available as single-dose vials through the LillyDirect self-pay pathway at $299–$699/month depending on dose strength. (Healthy Meals Incentives — Tirzepatide cost 2026)
Equipment Checklist (KwikPen Format)
KwikPen in the correct dose strength — verify the dose strength label matches your prescription
One alcohol wipe
FDA-cleared sharps container for pen disposal after use
Step-by-Step Injection Technique: KwikPen
Step 1 — Check the label. Confirm the pen’s labeled dose strength matches your prescription. Lilly produces six different strengths in identical pen designs — a simple label check prevents a wrong-dose injection.
Step 2 — Remove from the refrigerator 30 minutes before use. Allow the pen to reach room temperature. Cold tirzepatide solution causes more local stinging and tissue irritation than room-temperature solution. Unlike the small volumes in a syringe, a full pen barrel takes longer to equilibrate — 30 minutes is the practical standard. (Zepbound HCP Dosage and Administration — Eli Lilly)
Pens may be stored at room temperature (up to 86°F / 30°C) for up to 21 days for Mounjaro per FDA label — meaning if your injection day falls during a period when refrigerator access is inconvenient, you do not need to keep the pen cold. Check the current prescribing information for latest guidance on room-temperature storage duration for Zepbound, as labeling may differ slightly.
Step 3 — Inspect the solution window. Look through the pen’s clear viewing window. The solution should be clear, colorless to slightly yellow, and free of particles. Do not use the pen if the solution is cloudy, discolored, or frozen. Per the FDA Mounjaro Prescribing Information, NDA 215866, do not use pens that have been frozen.
Step 4 — Remove the gray base cap. Pull the gray cap straight off — do not twist. The needle is now exposed. Do not touch the needle or place the exposed end on any surface.
Step 5 — Select and prepare the injection site. Wipe the chosen site with the alcohol wipe. Let the skin dry fully (15–30 seconds). Never inject through clothing.
Step 6 — Press the pen firmly against the skin. Hold the pen at a 90° angle. Press the clear base firmly against the skin until you feel resistance give — this retracts the gray safety guard and arms the autoinjector.
Step 7 — Press the purple injection button and hold for a full 10 seconds. This is the most commonly violated step. The KwikPen requires the full 10-second hold to ensure the complete dose is delivered. Premature removal means medication leaks back through the needle track rather than being deposited subcutaneously. Watch the viewing window — you will see the plunger bar move during the 10-second hold, confirming dose delivery. (Zepbound HCP Dosage and Administration — Eli Lilly)
Step 8 — Lift the pen away. Confirm delivery. After 10 seconds, lift the pen straight off the skin. The pen’s dose window or indicator strip should confirm that injection is complete. Apply gentle pressure with a dry cotton ball or swab — do not rub.
Step 9 — Dispose of the pen immediately. Place the used pen in a sharps container. KwikPens are single-use. Do not attempt to use a pen a second time to extend supply — the needle is single-use and the drug delivery mechanism is not designed for reuse.
Site rotation is the most impactful preventive action you can take for the long-term safety and effectiveness of tirzepatide therapy. It is also the instruction most consistently under-followed.
What Is Lipohypertrophy?
Lipohypertrophy is the abnormal proliferation and fibrosis of subcutaneous fat tissue at an injection site in response to repeated mechanical puncture and chemical exposure. When the same small zone of subcutaneous fat is injected week after week, the adipocytes in that area multiply, enlarge, and eventually fibrose — producing a firm, rubbery lump beneath the skin. According to injection technique literature on insulin-using populations, approximately 64% of people who inject without systematic rotation develop some degree of lipohypertrophy over time. (StatPearls — Tirzepatide, NCBI Bookshelf)
Lipohypertrophy matters clinically for a specific reason: it disrupts drug absorption. Tirzepatide injected into lipohypertrophied tissue absorbs more slowly and unpredictably than medication delivered into healthy subcutaneous fat. The altered absorption can reduce the consistency of the drug’s weight-management effect — meaning a patient who habitually injects into the same small area of abdomen may see their tirzepatide become less effective over time, not because the drug changed, but because the tissue it is entering has changed.
WeightLossInjections.com editorial note: Lipohypertrophy is more common than most patients realize and is almost entirely preventable with disciplined rotation. Patients who develop a “favorite spot” — usually the same two-inch circle on the belly — are at the highest risk. We recommend setting a rotation reminder on your phone the day you start tirzepatide, before any habit has a chance to form. A small injection log costs nothing and prevents one of the more insidious long-term complications of self-injection therapy.
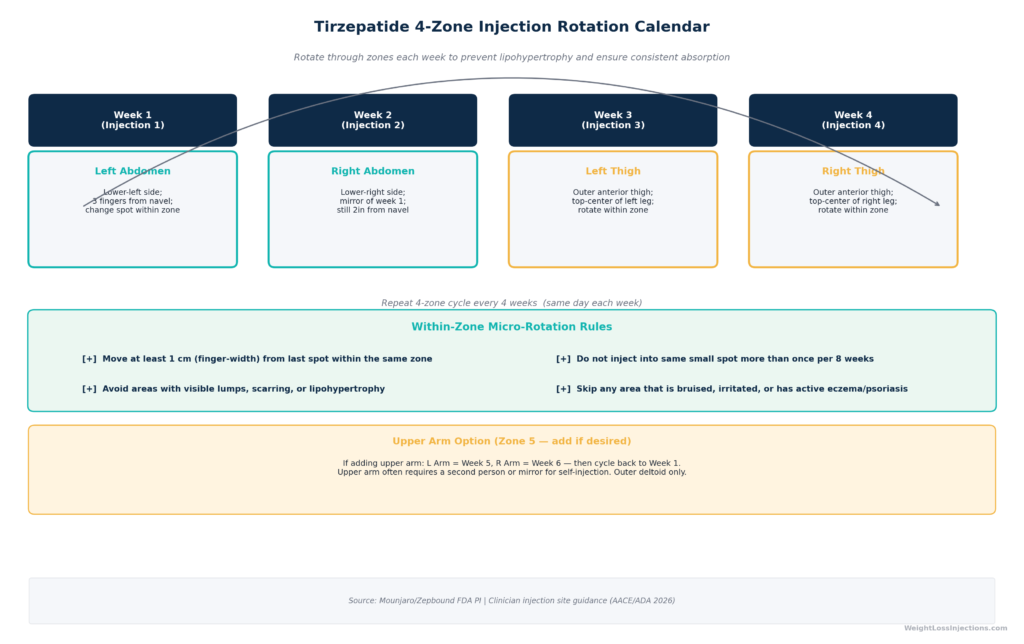
The 4-Zone Rotation Framework
Divide your available injection surface into four primary zones and rotate through them on a weekly cycle:
Zone
Description
Available Sub-Spots
Zone A — Right Abdomen
Right side of abdomen, ≥2 inches from navel; upper and lower right quadrants
4–6 sub-spots
Zone B — Left Abdomen
Left side of abdomen, ≥2 inches from navel; upper and lower left quadrants
4–6 sub-spots
Zone C — Thigh(s)
Lateral surface, mid-thigh; alternate right and left weekly
3–4 sub-spots per thigh
Zone D — Upper Arm
Posterior upper arm; requires partner assistance or assistive device
2–3 sub-spots per arm
Weekly rotation example:
Week 1: Zone A (right abdomen, upper-right quadrant)
Week 2: Zone B (left abdomen, upper-left quadrant)
Week 3: Zone C (right thigh, outer-lateral surface)
Week 4: Zone D (left thigh or posterior arm)
Week 5: Return to Zone A in a different sub-spot
Within each zone, space individual injection marks at least 1 inch (2.5 cm) from any previous injection mark, scar, stretch mark, or mole. This minimum spacing prevents micro-trauma from stacking on top of incompletely healed tissue.
Sample 4-zone rotation schedule for tirzepatide. Each zone gets at least 3 weeks of rest between uses, and each specific sub-spot within a zone rests even longer. Personalizing this calendar to your own zones and sub-spots is the most reliable lipohypertrophy prevention tool available.
Skin that is bruised, swollen, scarred, or has a palpable lump from prior injections
Broken, irritated, rashed, or tattooed skin
Areas with visible moles, birthmarks, or prominent blood vessels
The inner thigh (less subcutaneous fat, proximity to vascular structures)
Any area showing signs of lipohypertrophy (firm rubbery lump) — rest the site until it fully resolves
The gluteal region (not an FDA-approved tirzepatide injection site)
Tracking Your Rotation
You do not need a sophisticated system. A small notebook with a body diagram and a date next to each zone is sufficient. A note in your phone (even just “Week 1: right belly upper” dated to your injection day) provides the reference you need. The goal is simply to have a record you can check — because week-to-week site memory is unreliable for most people over months of therapy.
Our Top 3 · October 2026
The best GLP-1 providers right now
Independently reviewed. Ranked by price, medication access, provider quality, and patient outcomes.
Troubleshooting: What to Do When Things Go Wrong {#troubleshooting}
Most injection problems are technique-correctable. Understanding the mechanism behind each issue points directly to the fix.
Our take at WeightLossInjections.com: The vast majority of injection site anxiety is preventable with clear expectations before the first injection. Almost every issue described below — stinging, bruising, lumps, soreness — has a specific cause and a specific solution. The one category requiring medical attention is an actively growing, warm, tender lump that develops days after injection; everything else is almost always manageable at home with a technique adjustment.
Injection Site Lumps or Nodules
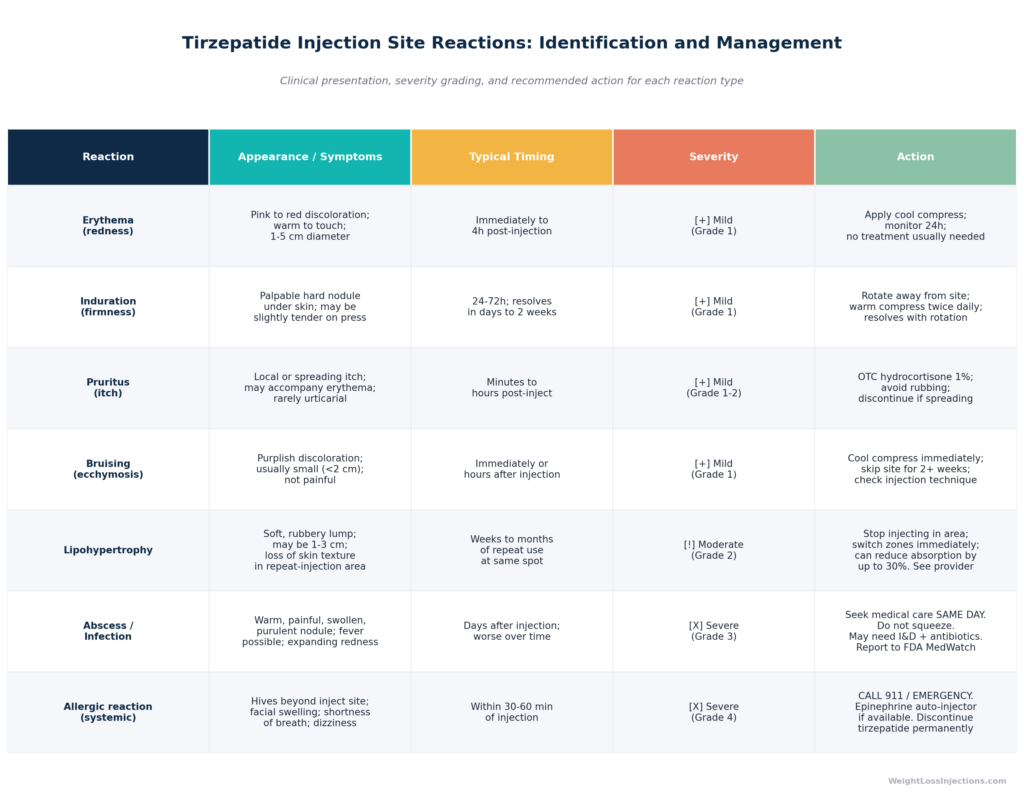
Small, firm lump immediately post-injection (resolves in 24–48 hours): This is simple induration — a mild local inflammatory response to the needle puncture and injected solution. The subcutaneous tissue swells slightly as immune cells and fluid accumulate. This is expected with any subcutaneous injection and does not affect drug absorption. Apply a cool compress for comfort. No other action needed.
Persistent firm lump lasting more than a week: This is the early presentation of lipohypertrophy. Stop injecting that site immediately. Mark its location on your rotation map and exclude it from rotation for at least 8–12 weeks, or until it resolves completely on palpation. Do not massage it — massage does not accelerate resolution and may cause discomfort. The site needs rest. (StatPearls — Tirzepatide, NCBI Bookshelf)
Warm, red, tender, growing lump (days after injection): This is the pattern of a possible injection site abscess — a bacterial infection of the subcutaneous tissue. Abscesses are rare with proper sterile technique but not impossible. Contact your provider promptly. Do not attempt to drain it yourself. Antibiotics are typically required; large abscesses may require surgical drainage.
Bruising
Minor bruising at the injection site is common, particularly in patients on anticoagulants (warfarin, apixaban, rivaroxaban) or antiplatelet agents (aspirin, clopidogrel). Technique adjustments that reduce bruising:
Let the alcohol wipe dry fully before injecting (wet alcohol on the needle carries it into the puncture track)
After needle removal, apply gentle pressure with a dry swab for 10–15 seconds (longer for patients on blood thinners — up to 2–3 minutes)
Never rub the site — rubbing spreads blood from disrupted capillaries
Do not adjust or discontinue anticoagulant therapy because of injection-site bruising without explicit direction from the provider managing that medication.
Stinging or Burning on Injection
The most common causes of stinging:
Cold solution: The most easily prevented cause. Allow refrigerated vials to warm 10–15 minutes and pens to warm 30 minutes before injection.
Wet skin: Allow alcohol to dry completely (10–15 seconds) before inserting the needle.
Speed: Injecting too quickly increases the pressure on subcutaneous tissue and amplifies the stinging sensation. Slow, steady plunger movement reduces it.
Citrate buffer in compounded formulations: Some compounded tirzepatide formulations use citrate buffer, which causes a burning sensation independent of technique. See the Citrate Buffer note in the vial technique section above.
Accidental Intramuscular Injection
Signs of inadvertent IM injection: immediate, sharp pain at the moment of injection (more intense than typical SC discomfort), potentially faster onset of tirzepatide effects in the subsequent 24–48 hours, and possibly more intense nausea from the faster absorption peak. A single accidental IM injection is not a medical emergency. Monitor for more intense GI side effects for 12–24 hours. No specific treatment is needed.
To prevent recurrence: use the correct needle length for your body habitus, use a pinch technique at lean sites, and consider the 45° injection angle at sites with shallower SC fat depth.
Accidentally Injected the Wrong Dose
Underdose (compounded vial): Contact your prescribing provider for guidance on whether to proceed with the next scheduled dose on schedule or adjust timing.
Overdose (compounded vial — particularly from concentration error): Contact your prescribing provider immediately. Monitor for intensified GI symptoms (severe nausea, vomiting), tachycardia, and — in patients also using insulin or sulfonylureas — hypoglycemia symptoms (dizziness, sweating, tremor, confusion). Seek emergency care if symptomatic. This is the most serious compounding-specific risk. (FDA GLP-1 Compounding Clarification Page)
Seeing Blood in the Syringe Before Injecting (Vial Format)
If you aspirate before injecting (as some older injection protocols recommend) and see blood enter the syringe, you have placed the needle tip in or near a blood vessel. Withdraw the needle immediately, discard the syringe and its contents, and restart with new equipment at a different site. Current subcutaneous injection guidelines from the ADA and other major bodies do not require routine aspiration before SC injection — the risk of intravenous placement at approved SC sites is very low with proper technique.
Systemic Reactions Requiring Emergency Care
Stop injecting and call 911 immediately if you experience any of the following after a tirzepatide injection:
Hives (urticaria) spreading beyond the injection site
Difficulty breathing, throat tightening, or shortness of breath
Swelling of the face, lips, tongue, or throat (angioedema)
Rapid heartbeat, dizziness, and spreading rash together (anaphylaxis)
Per the FDA Mounjaro Prescribing Information, NDA 215866, serious hypersensitivity reactions including anaphylaxis and angioedema have been reported with tirzepatide. These are rare but life-threatening and require immediate emergency response — not a wait-and-see approach.
Storage, Handling, and Travel Tips {#storage}
Branded KwikPens (Zepbound / Mounjaro)
Store branded tirzepatide pens refrigerated at 36°F–46°F (2°C–8°C) until ready to use. Per the FDA Mounjaro Prescribing Information, NDA 215866, Mounjaro pens may be stored at room temperature (up to 86°F / 30°C) for up to 21 days — useful for travel or situations where refrigerator access is intermittent. Check current Zepbound prescribing information for its specific room-temperature duration. Do not freeze pens; freezing degrades the peptide structure. Do not expose to direct sunlight or leave in a hot car.
Compounded Vials
Follow your pharmacy’s specific storage instructions, which take precedence over general guidance. Compounded vials typically require refrigeration at 36°F–46°F and carry a pharmacy-assigned beyond-use date on the label — the date after which the product should not be used regardless of physical appearance. Do not use a vial past its beyond-use date. Do not freeze. [service detail — confirm expiration and beyond-use date requirements with your dispensing pharmacy.]
Travel With Injectable Tirzepatide
Traveling with injectable medication requires planning, not improvisation:
Air travel: TSA permits medically necessary liquid medications in carry-on luggage in quantities exceeding the 3-1-1 rule, provided they are declared at the security checkpoint. Carry a prescription label or a letter from your prescriber if traveling internationally. Always pack injectable medications in your carry-on bag, not checked luggage — checked baggage may be exposed to temperature extremes in cargo holds, and lost luggage is an avoidable catastrophe.
Temperature management: Use an insulated medication travel case with a medical-grade ice pack for trips longer than a day. Insulin/medication-specific travel cases (e.g., FRIO evaporative cooling cases or insulated medication pouches) maintain safe temperatures for 24–48 hours without ice. For multi-day travel, identify refrigeration at your destination in advance.
Carry spares: Always pack at least one extra syringe (or pen), extra alcohol wipes, and your sharps container. Travel delays, lost bags, or dropped supplies happen.
Sharps Disposal: Needles, Syringes, and Pens {#disposal}
Used needles, syringes, and auto-injector pens are regulated medical waste and cannot be placed in household recycling or general trash in most jurisdictions. Improper disposal creates risk of needlestick injury to sanitation workers and others.
Sharps containers: FDA-cleared puncture-resistant sharps containers are available at pharmacies, online, and through many healthcare providers. Fill to the fill line (no more than ¾ full), seal, and dispose per local regulations — do not overfill.
FDA pharmacy take-back programs: Many pharmacies participate in pharmaceutical waste take-back programs that accept filled sharps containers. Ask your pharmacy whether they accept sealed sharps for disposal.
Mail-back programs: Several companies offer FDA-cleared mail-back sharps disposal programs — you mail your sealed container to a licensed medical waste facility. This option is particularly useful for patients in areas without convenient local take-back programs. Check SafeNeedleDisposal.org for a directory of local disposal options by ZIP code.
State regulations vary: Some states permit placing sealed sharps containers in household trash; others do not. Check your state health department website for current regulations.
Never recap used needles. The majority of needlestick injuries occur during recapping. After injection, move directly from the injection site to the sharps container without recapping.
Conceptual absorption profile comparison for tirzepatide across the three approved injection sites. Published pharmacokinetic data from the FDA Clinical Pharmacology Review, NDA 215866 shows no clinically significant difference in total drug exposure (AUC) between sites. The abdomen reaches peak serum concentration slightly earlier, but all three sites deliver equivalent clinical effect. Rotate for tissue health — not for pharmacokinetics.
Getting Started with WeightLossInjections.com
Proper injection technique is a clinical skill — and like all clinical skills, it benefits from guidance from a provider who knows your specific formulation, dose, and history. WeightLossInjections.com connects patients with licensed providers who prescribe and oversee tirzepatide therapy, including personalized instruction on injection technique, site rotation planning, and management of any reactions that arise.
Starting at [$X/month] for [service detail], our care team is available for follow-up consultations when an injection site question needs clinical eyes — whether you’re adjusting your rotation plan after finding a lump, troubleshooting a persistent stinging reaction, or preparing for travel with injectable medication.
“Correct injection technique is not just about safety — it’s a direct determinant of how consistently your medication works. A patient who injects into lipohypertrophied tissue every week may be getting significantly less tirzepatide than prescribed, with no visible warning sign until their results plateau. Teaching technique is part of every conversation I have with new tirzepatide patients.”
— the WeightLossInjections.com Staff
Questions about your tirzepatide injection? Our care team can walk you through every step — from your first dose to your hundredth. [Get started →]
FAQ {#faq}
Where is the best place to inject tirzepatide?
All three approved sites — abdomen, upper outer thigh, and posterior upper arm — are pharmacokinetically equivalent for tirzepatide delivery. The abdomen is the most popular for self-injection because it is easy to see and access, offers the largest available surface area, and allows the most sub-spots for rotation. The outer thigh works well for patients who prefer injecting while seated. The posterior upper arm is most practical with caregiver assistance. Any systematic rotation using all three approved zones is appropriate. Per the FDA Mounjaro Prescribing Information, NDA 215866, all three regions are validated and equivalent.
How do I inject compounded tirzepatide from a vial?
Gather a 28–31g insulin syringe, alcohol wipes, and a sharps container. Wipe the vial stopper with alcohol; draw air equal to your dose volume into the syringe; insert the needle into the stopper and inject the air; invert the vial and pull back the plunger to fill your prescribed volume; remove air bubbles by tapping and slowly expressing them; withdraw the needle. Clean your chosen injection site with alcohol and let it dry; pinch skin if needed; insert the needle at 45–90°; inject slowly; remove and discard in a sharps container. See the full step-by-step guide in the Vial Technique section above. Always confirm the vial concentration before calculating your draw volume.
What is the correct needle angle for tirzepatide injection?
Use 90° (perpendicular to the skin) for most adults with average or above-average subcutaneous fat at the abdomen or thigh. Use 45° for lean patients or sites where subcutaneous fat depth is shallow — typically to ensure the needle does not reach muscle. The BD 31g 5/16″ needle at 90° is sufficient for subcutaneous delivery in most adults. If you are very lean or injecting at the thigh with minimal adipose tissue, the 45° approach or a shorter 6 mm needle reduces IM risk.
How far apart should tirzepatide injection sites be?
Space each injection at least 1 inch (2.5 cm) from any previous injection mark, scar, stretch mark, or mole. For abdominal injections, stay at least 2 inches from the navel in all directions. Never inject into an area that is bruised, lumpy, warm, or tender. Per the FDA Mounjaro Prescribing Information, NDA 215866, rotating the injection site with each dose is an explicit labeled instruction.
What should I do if I get a lump at my tirzepatide injection site?
A small lump immediately after injection is normal simple induration — it resolves within 24–48 hours and requires no action beyond a cool compress. A persistent firm lump appearing and growing over days to weeks is likely early lipohypertrophy — stop injecting that site, exclude it from your rotation for 8–12 weeks, and let the tissue recover. A warm, red, tender lump that grows over several days after the injection — particularly with spreading skin redness — suggests a possible infection and warrants prompt provider evaluation. Do not delay seeking care for an infection. (StatPearls — Tirzepatide, NCBI Bookshelf)
Can I inject tirzepatide in my arm by myself?
The posterior upper arm is an FDA-approved injection site for tirzepatide, but self-injection there is genuinely difficult. Most people cannot maintain proper 90° positioning, adequate skin visualization, and needle control simultaneously at the back of their own arm without a mirror or assistive device. Most patients use the arm site only with a caregiver’s assistance and rely on the abdomen or thigh for solo injections. If you want to add arm sites to your rotation but inject alone, consider a dedicated injection-assist positioning device and practice the positioning before attempting the injection.
How should I dispose of used needles and pens?
Used needles, syringes, and pens must be placed in an FDA-cleared puncture-resistant sharps container immediately after use — never in household trash or recycling. Sealed containers may be returned through pharmacy take-back programs, mail-back services, or in accordance with your state’s sharps disposal regulations. Check SafeNeedleDisposal.org for a local disposal directory. Never recap used needles.
Medical Disclaimer: This article is for informational purposes only and does not constitute medical advice. Always follow your prescribing provider’s specific instructions for your tirzepatide formulation, dose, and injection technique. Signs of a serious allergic reaction — hives, facial swelling, difficulty breathing, or anaphylaxis — require immediate emergency care (call 911). WeightLossInjections.com does not prescribe medications directly. Consult a licensed healthcare provider for all medical decisions.

![Unbranded [pillar-drug-class] injection pen on a neutral background — WeightLossInjections.com editorial hero](https://weightlossinjections.com/wp-content/uploads/2026/07/hero_tirzepatide_c3_safety-1200x675.png)